Refining the Playability of Pong

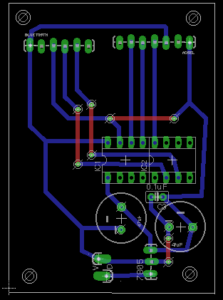
In my initial version of ‘Many Games of Pong‘, the act of switching between controllers was so frustrating that it deterred players from doing so. This design used a 6-pin usb-to-serial adapter, which the user had to plug in “just right” before they even could play. The diagram below illustrates this initial schematic and systems.

This point of friction detracted from the key idea of players testing different controllers and de-standardizing the tools used to play games. As such, I’ve continued to develop the circuit with a focus on selecting and switching-between controllers.

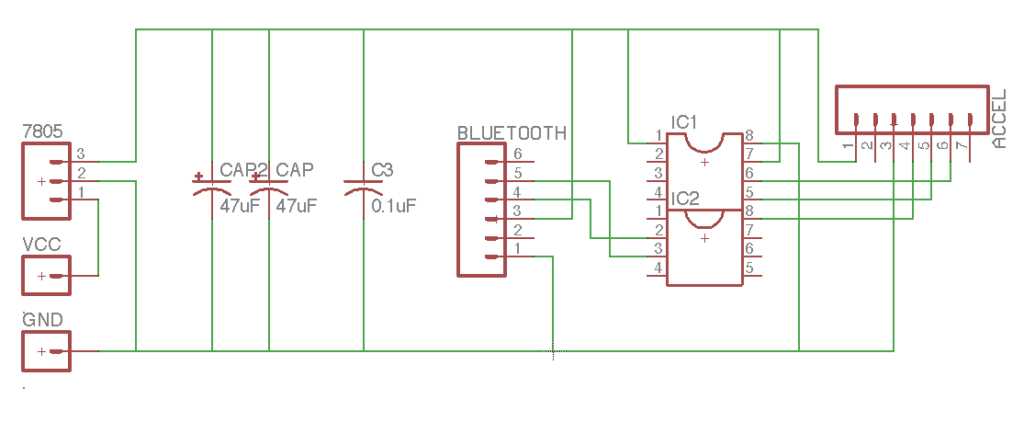
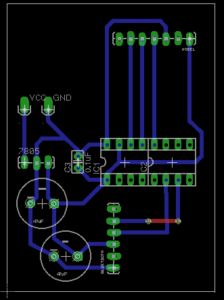
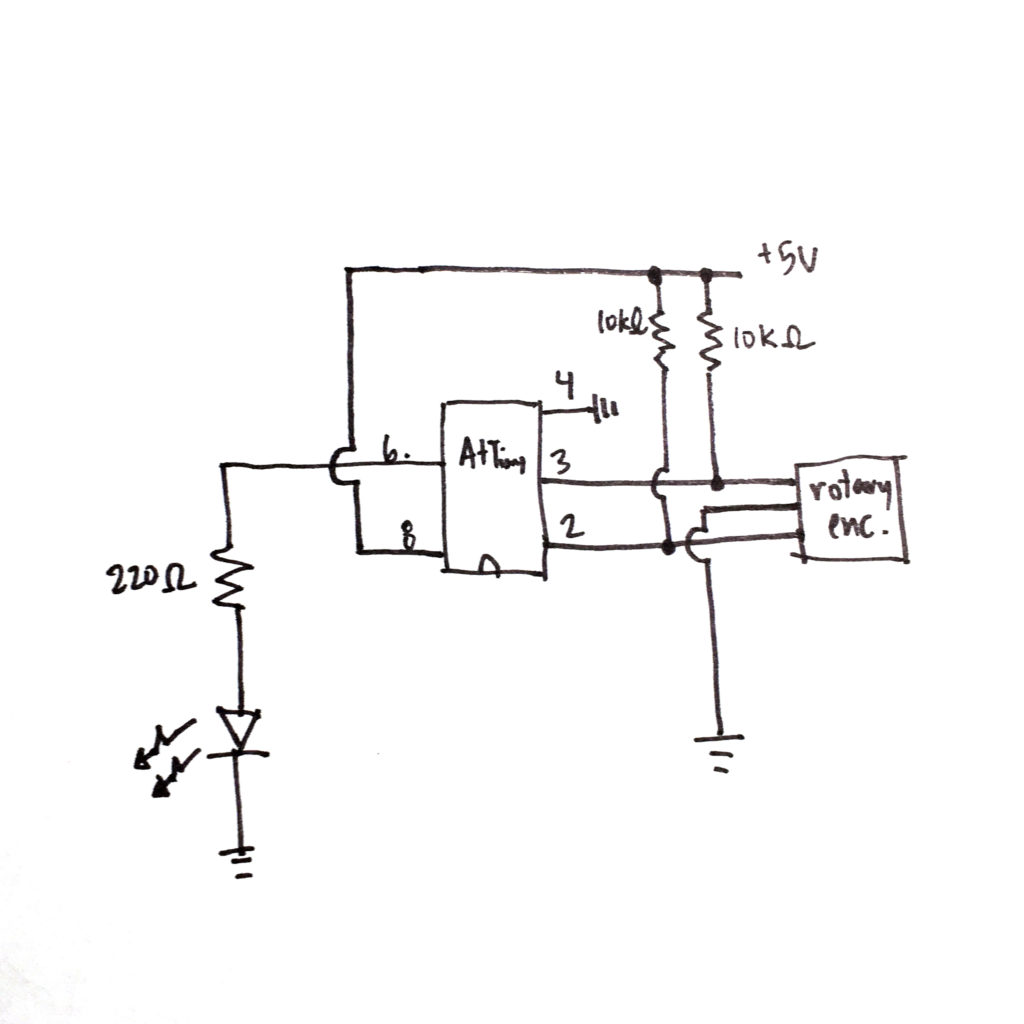
The new circuit, illustrated above, uses an ESP8266 Wi-Fi chip microcontroller to eliminate wiring for sending data to the between the game and controllers. Additionally, a toggle switch, coupled with an LED, sets the state of whether or not a controller is actually connected to the game (as opposed to the hardwired connection). The server-side code keeps track of which controllers are connected and which player they’re associated with.

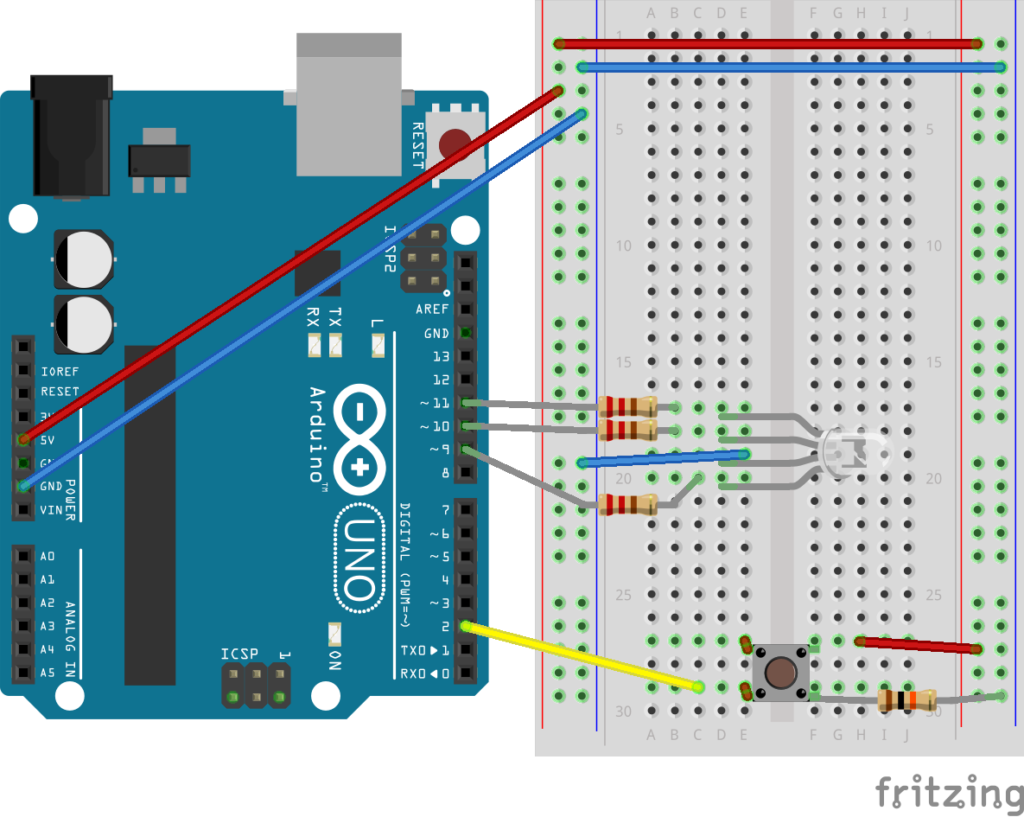
There’s a delay between pressing a button and seeing the effect on screen that’s still lingering, as well as the question of power. The video shows a wired connection from each controller to the computer, but that’s simply for power – not data transfer.

Code Updates

This iteration also focused on simplifying the code. My previous code for moving the paddle based on each controller was verbose and repetative. I’ve since rewritten the code to use switch cases which really simplified things.

Next Steps

The next step in the project is to create custom boards rather than use the Huzzah. Adafruit’s ESP8266 breakout board is a good reference for starting the schematic. Since some of the controllers use digital sensors (simple push buttons) while others rely on analog (photocell), the boards will be slightly different for each. Additionally, I’d like to put more time into the tangibility and tactile qualities of the sensors I use and have been hunting down various products.

Future References

A Music Controller Not To Be Seen

Legibility and Feedback

When a controller is to be operated while not being seen, legibility of sensors/inputs and feedback of action are important considerations.

Legibility refers to how do you know what control does what? This may indicated through its shape, texture, and relational configuration or orientation. Regarding configuration: How are the controls oriented with respect to each other/themselves? How are the controls oriented with respect to the body? How is the entire controller oriented with respect to the body?

Feedback refers to how do you know you’ve done something? Without sight, this could be communicated through sound or touch and haptics. Haptics may be additional feedback beyond any physical alteration of the sensor itself, such as a vibration. But it may also be a result of the sensor itself. For example, a maintained push button will have a different feel relative to the enclosure when depressed versus released.

The Scale of Physical Interaction with an Object

As the controller is not seen while being operated, does that scale of interaction and controller increase? When controllers are considered as objects, interaction can occur the scale of the whole hand rather than individual fingers. Some initial thoughts I considered:

  • Is it a glove interface between two hands? Touching different fingers together triggers different functions.
  • Are objects held and placed down on a surface to trigger different events?
  • Does an object have different faces which are touched to control different functions?

Sustained versus Momentary Interactions

How are interactions different when they are sporadic events such as momentarily pushing a button or flipping a switch versus a sustained interaction such as steadily holding down a button or shaking an object? What is the difference between an event-based interaction, and interaction of duration? Do each of these have different responses to the “directionality” of a controller or interaction?


Controllers

When considering the music controller at the scale of an object interacted with by the whole hand, I considered three scenarios.


All Functions Concentrated into a Single Object, Functions are Fixed to Faces (Absolute Faces)

Different sides of an object trigger different commands. When all functions are combined into a single object, their configuration with respect to each other is important as the user must understand the orientation of the object itself. The tactile difference between each side is important for this orientation.
Further Development: Rather than a cube, does the object have two rounded sides for “previous” and “next” as they are momentary actions rather than sustained stairs? How is each face differentiated: many materials, texturing of the same material, shapes, etc.

Single Object

Each Function is a Different Object (Absolute Objects)

Moving any object in any axis triggers the associated function. In this instance, orientation and configuration between objects does not matter, which allows individual users to configure the objects as desired. However, the legibility of each individual object is incredibly important as their shape, size and texture allows the user to discern one from the other.
Further Development: Explore different sets of objects: all the same material yet different forms versus all different textures but the same form

All Functions Concentrated into a Single Object, Functions are Associated with Gesture and Direction (Relative Faces)

Similar to the first consideration, all functions exist within one object. However, the functions are not fixed to faces but rather the spatial direction or gesture. The orientation of the object is remapped after each gesture in order to allow it to occur in succession.
Currently in development


Schematic including socket for AtTiny84 and connection for 9V battery supply. Pins 5 and 4 on the Bluetooth connector are Rx and Tx respectively.

Circuit Boards

Keen to develop the enclosures further after this week, I chose to mill the circuit boards and use AtTiny84s as the microcontrollers. As the controller is based around interacting with an object, I prioritized making them wireless and configuring different setups in order to fabrication with a number of different enclosures.


The Most Verbose, The Most Concise

Verbose v. Concise
What does it mean to have many functions distributed over many controls as opposed to many functions concentrated into a single control?

The required functions are as follows:

  • An on and off control
  • When turned on, the previous brightness level is restored.
  • Each color channel can be faded from off to full brightness.
  • Overall brightness can be faded.
  • Brightness is maintained when fade control is released.
  • Fade is interruptible by other controllers.

Below describes one controller (as pictured above), and one proposed controller (to be completed shortly, when my millions of switches arrive…)

  • CONCISE (one momentary connection): 1 push button that turns an LED on and off, fades each color channel from off to full brightness, and fades overall brightness.
  • VERBOSE (many maintained connections): 1 toggle switch that turns an LED on and off, and when turned on, restores the previous brightness level; 255 toggle switches for each channel, (765 total), fade from off to full brightness; another 255 toggle switches fade overall brightness.

In building out the Concise Controller with a single button, the LED functioned not only as the ‘lamp’ itself, but also as a visual indictor for each of the functional conditions. Blinking, fading and solid levels in combination with timed intervals are used to indicate, and then ‘lock in’, changes by the user.

Breadboard Diagram

However, how the light is turned off is still a particularly inelegant solution. As an option, it is within the same set of selections as individual color channels, and while the blinking rhythm is different, I anticipate this will be a point of confusion in practice. Alternatively, I’d like to implement an “off” switch by holding down the button for a set period of time and can occur at any point. I tried to get this functional in code, but it needs more work.

Link to Github Gist


At Scale of the Controller v. Transistor
What prompted this idea of verbose and concise controllers was how states are tracked by sensors themselves.

Change is either ‘remembered’ as a constant state as with a toggle switch, or as a change in state as with a push button. (Maintained connection versus momentary connection.) Interestingly, sensors, like push buttons or force sensors, which indicate a change in state from the base condition do not have visual indicators themselves which show the change. (As opposed to a potentiometer or toggle switch in which the state or reading is reliant of the actual physical position — and thus visual indicator.)

How can either of these techniques promote a verbose or concise set of controls?

  • Brightness levels and states can either be ‘remembered’ by provisions in the code or are ‘remembered’ by hardware constitution/wiring of the sensor;
  • A toggle switch sets one of two physical states, determining an electrical connection, though still coded, as one position is identified as On while the other is identified as Off.
  • Similarly, knob and linear potentiometers: The physical connection is maintained at the adjusted position( Rotary knob: requires storage, but differently;

Conversely, a push button denotes a change in state, but isn’t physically changed once it is released; thus it relies more directly on code (physicality at another scale) to toggle between On and Off. A push button is a change, whereas the toggle switch is either on or off.

Similarly analog sensors:

  • Force sensors/soft potentiometers output a default reading unless a change/interaction is sensed (depending on wiring);
  • Like the push button, for the value to persist, it must be stored in the code.

Early Sketches

Controlling an LED with a Rotary Encoder

Using a rotary encoder, I’ve wired up a dimmable LED using an AtTiny. I haven’t worked with a rotary encoder before and quickly discovered it was nothing like a potentiometer besides for the fact that it turns. The rotary encoder also has a push button which I’d like to further incorporate and be able to toggle on and off the LED without going through the dimming process.